Sunday, January 31, 2021

Almost done, and done

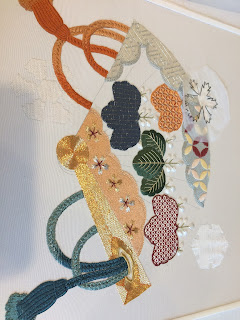
 We had a zoom class between Christmas and New Year's, to cover the gold work, and the making of Katayori. This lead to the motivation to get a move on and finish Hiogi. Once the golden rib was complete, the end felt really achievable by the end of January. Hiogi was completed on the 19th, and off to the framer so that I could show it off at our local embroiderers' guild meeting on the 26th of January. Here it is laced on to foamcore, ready to go to the framer.


It was some pretty steady stitching to finish, and I am thrilled with the result. I know it isn't perfect, but it is as perfect as I could make it. It never ceases to amaze me how the finishing part of the beating the embroidery while still on the frame and pasting up and steaming changes the look of the piece, The silk in areas that looked like they had been rubbed a bit and were starting to look fuzzy become shiny again and lie as they should and the fuzzy effect lies flatter and just look better. It is hard to explain, but the finishing makes all the difference in the world.

The gold rib alone took 15 hours after the class to complete, I haven't gone back yet and added up all of the hours that went into this piece. I think my favourite part was stitching the cords and tassels, and my least favourite was the fuzzy effect snowflakes. The gold rib was fascinating, as it is mostly one pair of #5 Japan gold threads, that is couched around the shape until it was all filled in.


Once that was complete, the other bits that needed finishing were achieveable, but not as noticeable in a big way, like finishing the short stitch holding in the green pawlonia leaf, and the short stitch holding in the cherry blossom cloud. 

The katayori was interesting to twist and I managed to twist all of the needed threads in two sessions. Couching took longer and I found I needed to couch three pairs of katayori to cover the guide lines of the clouds, instead of just two as called for in the box chart. 


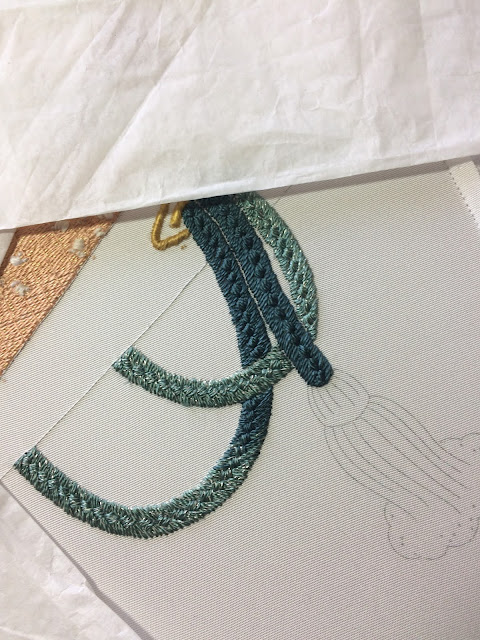
Here the katayori is complete and the last bit of work, the dreaded fuzzy effect snowflakes being worked on. I had completely stitched the large snowflake on the upper right, and then took the whole thing out because it was awful. Here, the white soft twist foundation is back, ready for the pale grey layer, and the third snowflake is being planned to peek over the top of the fan on the upper left. Once these were done, the last bit was to couch the gold of the inner ribs, and the outer line on the left and the arc of the fan. Stitching the ribs was quite tedious and time consuming, as I chose not to just clip the threads on the back and let them dangle in the Japanese way once they were plunged to the back, but I turned each one back and whip stitched them down. They aren't going anywhere in my opinion.

I took the final pictures of the front and the back before pasting up and sent them to my teacher, Marian, for her approval.


And here it is on the wall of my living room, where I can enjoy it as much as I would like.

We are planning on starting 'Karahana' , a phase 4 piece, via zoom, at the end of February, if everyone who is joining the class has all their materials by then.


Monday, January 4, 2021

The golden main rib

 After picking at bits and pieces for a while, and developing a true hate for the cherry blossoms on Hiogi, we decided to have another zoom session over the Christmas break to look at some of the elements needed for finishing. 

I know I need to redo the snowflake on the upper right, it is too ugly, and the cherry blossom cloud needs a fair bit of work, it is fair to say that no more classes are needed for Hiogi. Karahana has arrived in the mail, and I am ready to move on to phase 4. 

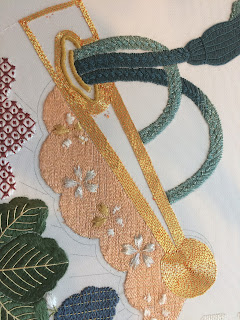
Things to watch for while stitching the gold rib: the couching thread likes to knot itself up, and can make a ball of mess on the back, so let it untwist every once in a while to help prevent knots. use a ruler to line up the long sides especially the side where the cords make a gap in the gold. Mine could be straighter, but will do. the cloud side is nice and straight, it is the lining up of the lower side that I wouldn't give it 100%. 

It was interesting going around in the circle at the base of the rib, keeping the koma moving and snugbut not too snug helpe keep things lined up.

Slow and steady filling in the spaces.


It took about 15 hours to stitch the whole rib, over 4 days, but I am feeling good about it.  The end is in sight.

The elements that need to be completed are 
1) finishing the short stitch holding in the green leaf
2) redo the upper left snowflake
3) the cherry blossoms, and short stitch holding on the cherry blossom cloud
4) the Katayori pairs around the clouds
5) the Katayori around three of the the paulownia leaves
6) add a third snowflake
7) the thin gold rib lines
8) the #5 gold along the arc of the fan and one straight edge

The trick is to keep plugging away at it.

We talked about making the katayori in the zoom class too, and I have some of those threads made up. I quite enjoyed twisting those threads up.


Saturday, October 10, 2020

Back to work on Hiogi

 After an end of summer hiatus, it is back to Hiogi. I have finished the teal tassel, and am feeling quite pleased about that one too. Cords and tassels are now complete and it is on to finishing snowflakes and the cherry blossoms on the peach coloured cloud.


I am not loving the cherry blossoms in mettallic. I have decided to stop pulling out the petals as I go but am stitching each petal with a separate piece of thread so that when they are all done I can pull out just the ones that I hate the most, and try to stitch them better. Some of the petals are starting to look acceptable, but no pictures to share yet.


I have completed 'Toadstools' by Alison Cole in the past month, for fun. This was a workshop sponsored by Virtual Threads. Chipping is boring to do but the effect is just right. It is at the framer, and I haven't decided what to do with it once it returns. It might be a Christmas gift for a family member, no idea which one.


I am also working on 'Metalwork Squirrel' by Becky Hogg. This is good practice for the goldwork part of Hiogi, especially the circular couching. This is another Virtual Threads workshop. Becky Hogg, formerly an instructor at the Royal School of Needlework, has a lovely line of metalwork projects, mostly birds. I have the Heron kit set aside to work on at some point to. Her instructions are really clear and pretty much guarentee a delightful finish, and learning experience. Each piece is designed to be mounted in a four inch hoop for display when finished, so they are quick illustrations of various metalwork techniques.


Friday, August 21, 2020

more on cords and tassels

 The flame coloured tassel and cords are complete. The karayori  lines on the tassels really work at defining the shape and flow of the tassel, and joy of joys I did remember how to do the round knot. The knots on the edge are made with a gold filament in the thread but the gold doesn't really show up, one or two tiny glints and that is it, so not sure why this was asked for, but the gold is there in case anybody ever asks. The flame cords are finished, and the snowflake bricked, so the lower left area of the design is done.

A friend, who is doing the same level 2/3 piece commented that she had a hand-written note to herself saying to pad the head of the tassel before stitching. I did not do any padding , and I'm not going back now to change it, though it sounds like a really good suggestion, and would make the tassel stand up more from the cord. That is something for others to contemplate with their pieces. I have sent out a message to our instructor for an opinion as to whether I should pad the teal coloured tassel head or not. I think not as this tassel isn't over a cord and the tassel head doesn't really need to be emphasized more that it is.

Looking at the fuzzy effect snowflakes, the lower one is completely bricked, and the upper right one is laid but doesn't have the short stitch holding. I have decided to add a third snowflake, and a stencil of the flake is basted on in the upper left position, but will probably be moved so that it is partly behind the fan. The actual placement will take some more thought. All this is going on while I avoid the cherry blossoms on the peach coloured cloud.

Where things stand at the moment:


Friday, August 14, 2020

Cords and Tassels

 So, after not having great success with the cherry blossoms, so they are just going to sit there as outlined and padded, until I get back to them, I have moved on to work on the cords. I am fairly pleased with the results, so far. with the teal cords on the right hand side, emerging from the grommet. I tried having the metallic thread in the dark section first but really didn't like it, so pulled that out, and re-stitched with solid colour, and put silver in the lighter teal thread. My eye liked that better. I transitioned from dark teal to the light with silver so there is only one transition in the teal cord, but I am satisfied with the blending.

With the flame coloured cords on the left hand side there are two colour transitions. Dark flame to light flame, to light flame with gold.  The tassels is ready for the karayori to be couched on, before the cords can be completed. The Fuzzy effect snow flake needs to be couched too. Progress is being made.

Tuesday, June 16, 2020

Progress on Hiogi

Making progress on Hiogi, the paulownia buds are stitched and some of the stems are in, the veins in the green leaf ( separated single layer) are on, but the short stitch holding is not complete. the cherry blossoms are basted on , as is the grommet on the main rib of the fan. So what I need to do now is finish pulling away the tracing paper that was used to establish the stitching lines, and do some short stitch holding. I tried the short stitch holding and it is a challenge, so while it looks OK on the spaces in Shippo, it doesn't look good on the paulownia leaf. I think I need to set up some threads on a piece of waste fabric and practice this technique. I do have a piece of habutae and some orphan flat silks so I can practice before I go and ruin something on Hiogi.

Sunday, June 7, 2020

Japanese Embroidery adventures

A group of people, all women, in St. John's NL, are working on phase 2/3 of Japanese Embroidery through the Jaoanese Embroidery Center. Our teacher has come to us from Edmonton AB, and was supposed to come in April 2020, needless to say that did not happen, so in the time of Covid 19 we have been learning via Zoom. With Zoom classes, two people were able to finish up their phase one pieces, two of us were already done, and now four of us are at different stages of the phase 2/3 piece called Hiogi.

Here is the piece with the pre-work done, the temporary holding threads on the top section are in correct, and had to be fixed before stitching there could begin, not a big deal ( fortunately).

There are some advantages to the Zoom style of learning. We can have shorter sessions spread out over time so that we can concentrate on one or two areas of the piece and then finish them before moving on to the next bit. Also we can discuss the prework that needs to be done for and  have it ready for the next zoom session, so we don't waste time stitching the foundation in class time but have it ready to do. Twisitng threads for classes can be done ahead of time too, and that can save a large chunk of class time. It looks like we will be able to have large chunks of this piece done before we will really need to have the teacher physically in the room with us. It is exciting to see it advance.

I found the woven effect ( in blue with a touch of gold) paulownia leaf hard, as the individually threads seem to swim together when you want to catch a specific thread to couch it down. And of course I managed to bleed on the white foundation thread for the tie dye effect leaf. Spit and blot, and tear out a section of thread, and changing the shape of the leaf slighlty fixed that little nightmare. However, the short stitch holding may defeat me.

I think the best way around this is to set up a hoop, and lay some flat silk and figure it out. And do a section of twisted thread too. I do have some Habutae and some orphan flat silks in my stash so this is possible.

I will add a photo of where I am as of today.